As I develop I have Guard running in the background, executing my tests when things change. But I often don’t have the Terminal window front and centre, so I like to have Growl notifications for my test results. Setting up Growl to push notifications from the Virtual Machine to the host is a little tricky, so here’s a simple example to show how to do it.

Growl isn’t as hairy as ‘old Ephraim’ but is probably more useful
Getting Started
To get started and see Growl notifications, we need to do a little more than normal. Let’s start by checking out the source code:
git clone -b guard_growl --single-branch https://github.com/eyefodder/spex.git
Prepping Growl
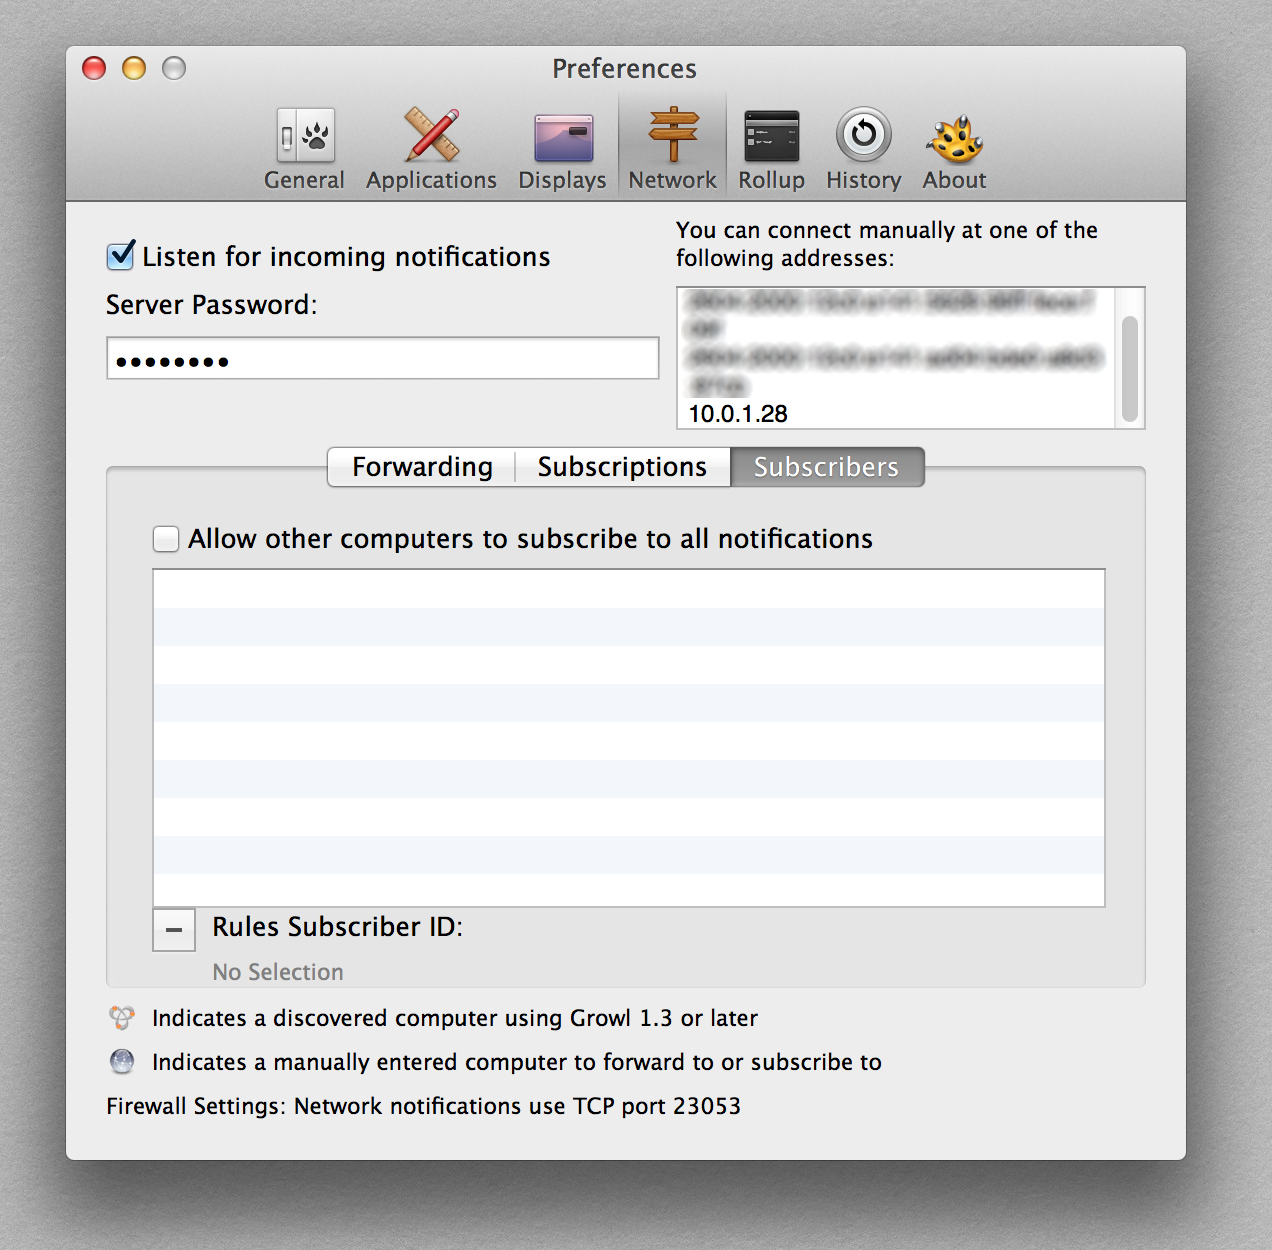
Download Growl if you don’t already have it. Once it’s installed, open up the preferences pane and click on the ‘network’ panel. Check the box marked ‘Listen for incoming notifications’ and enter a password:
Prepping Vagrant
The next thing we need to do is install a plugin for Vagrant that will allow us to execute a script on the host machine when we boot our virtual machine. I’ll explain what that is below the fold, but for now, make sure that you have Vagrant 1.6.4 or above (hint, type vagrant -v to find out) and update if necessary. Next, install the Vagrant Triggers plugin by entering this on the command line:
$ vagrant plugin install vagrant-triggers
Bringing the virtual machine up
Next, run vagrant up as usual. When it runs, it creates a file ops/dotfiles/guest_bash_profile:
# Edit the following values with your own values

# Growl password set in Growl > Preferences > Network
export GROWL_PASSWORD=enter_growl_password

# The following entries are automatically generated
# Do not edit unless you know what you are doing!
# They are regenerated each time the virtual machine is rebooted
export HOST_IP=10.0.1.28
Go ahead and enter your Growl password. Now we’re good to go. run vagrant rsync-auto to keep things in sync and in another window, then vagrant ssh into the machine.
Hey presto! Growl notifications
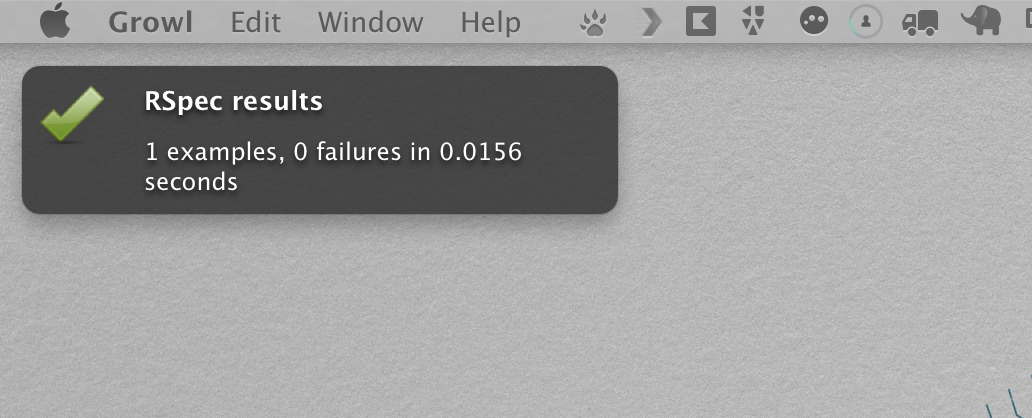
So let’s get up and running! When you are ssh’d into the host machine, fire up Guard with cd /app && bundle exec guard -p. Make a change to your code and when the tests run you should see a notification:
You’re good to go now, but read on if you’d like to understand how all this stuff works…
How it works
There are a lot of moving parts to get this thing going. I’m going to work from the Guardfile back, and then the Vagrantfile forwards. I guess we’ll meet somewhere in the middle so bear with me.
Guardfile changes
If you look in the Guardfile you will see a few new lines of code at the top:
host_ip = ENV['HOST_IP']
growl_pass = ENV['GROWL_PASSWORD']
PLACEHOLDER_GROWL_PASS='enter_growl_password'

if host_ip.blank? || growl_pass.blank? || (growl_pass==PLACEHOLDER_GROWL_PASS)
  puts 'host notifcations off: you must set HOST_IP and GROWL_PASSWORD in ops/dotfiles/guest_bash_profile'
  notification :off
else
  notification :gntp, :sticky => false, :host => ENV['HOST_IP'], :password => ENV['GROWL_PASSWORD']
end
Line 23 tells Guard to use GNTP for notifications (assuming HOST_IP and GROWL_PASSWORD have been set). It’s basically a means for sending Growl notifications over a network. You’ll need to add the GNTP gem, so we’ve added this to our Gemfile:
  # guard_growl
  gem 'ruby_gntp'
We can see that this system relies on a couple of environment variables being set. We got a clue that these get set in ops/dotfiles/guest_bash_profile, let’s see how that file gets created, and how we get that linked into the guest Virtual Machine.
Creating the guest bash profile
For this setup to work, we need two environment variables set: GROWL_PASSWORD and HOST_IP. The script that creates the file is ops/setup_guest_bash_profile. This script does a few things, so let’s step through it:
Create a profile file if it doesn’t exist
The first thing we want to do is create a profile file if one doesn’t exist already:
# make a profile file if it doesn't exist
bash_file=dotfiles/guest_bash_profile
touch $bash_file
Next, we want to add some comments to the file. As we will run this script every time the machine boots up we only really want to add these comments if they don’t already exist. The add_comments_once function does this by checking for a match, and only adding the comment if it isn’t already in the file:
add_comment_once(){
  comment=$1
  grep -q "$comment" $bash_file
  if [ $? -ne 0 ]
  then
    echo "# $comment" >> $bash_file
  fi
}
Adding a bash entry for users to change
Next thing we want to do is add environment variables for users to change. But as this code is run multiple times, we actually have three scenarios:
- An entry doesn’t yet exist in the file: create it
- An entry exists but hasn’t been changed from the default: tell user to change it
- A user has entered their own value: don’t do a thing!
The add_bash_entry function achieves this:
add_bash_entry(){
  token=$1
  default=$2
  change_message="You need to enter your $1 in $bash_file"
  entry_comment=$3

  grep -q $token= $bash_file
  if [ $? -eq 0  ]
  then
    grep -q $default $bash_file
    if [ $? -eq 0 ]
    then
      # entry exists, but it's set to default value from this script
      echo $change_message
    fi
  else
    # variable entry doesn't exist
    echo $change_message
    echo $entry_comment
    echo "" >> $bash_file
    echo "# $entry_comment" >> $bash_file
    echo "export $token=$default" >> $bash_file
    echo " " >> $bash_file
  fi
}
The function gets three arguments: the token GROWL_PASSWORD, the default value enter_growl_password, and a message to explain to the user what to do. If the token is found (lines 22 & 23) then it looks for the default value (lines 25 & 26) and prints a change message if it’s there. If the token isn’t found (lines 32-38) then we write that into the file.
Adding the HOST_IP as a system generated value
The next thing we want to do is add the host system’s IP address to the file so that Growl knows where to send notifications:
sed -i '' '/HOST_IP/d' $bash_file
# grab current host IP
ipaddr=`ifconfig | grep "inet " | grep -v 127.0.0.1 | cut -d ' ' -f2`
# and write to file
echo "export HOST_IP=$ipaddr" >> $bash_file
This script deletes any existing lines with HOST_IP in them (line 65), then uses a little bash trickery to find the current host ip. I found out how to do it from this post, although I needed to change the delimiter from \ to ' ' (that’s from an escaped space character to a space in quotes. Finally we write this out to our guest_bash_profile file. The next step is getting this script to run when we want it.
Running the profile setup script when Vagrant starts
Thanks to the Vagrant Triggers plugin, this is a really simple affair. We just add the following to our Vagrantfile:
  config.trigger.before [:up, :reload], :stdout => true do
    run "sh ./setup_guest_bash_profile.sh"
  end
This will run our script every time we call vagrant up or vagrant reload, ensuring that our host ip address is always up to date in the file. The last piece of the puzzle is to make sure we use this file to actually set environment variables on the guest machine.
Linking the guest bash profile to the guest virtual machine
This is a relatively simple two-part process. First thing we do is share the ops/dotfiles directory on the virtual machine:
config.vm.synced_folder 'dotfiles', '/dotfiles'
Secondly, we want that file symlinked in the guest machine to ~/.bash_profile. I created a new Puppet class to achieve this. Check out ops/puppet/modules/spex/dotfile_symlink.pp:
class spex::dotfile_symlink{
  file { '/home/vagrant/.bash_profile':
    ensure => link,
    target => '/dotfiles/guest_bash_profile'
  }
}
Super simple here. We tell puppet to ensure that /home/vagrant/.bash_profile is a symlink to /dotfiles/guest_bash_profile. In ops/puppet/manifests/default.pp we simply include the class with the others:
include spex::base_packages
include spex::postgres_setup
include spex::ruby_setup
include spex::dotfile_symlink
Now we have everything wired up and ready to go!
Conclusion
This wraps up my example for getting Growl notifications from Guard into the host machine. Although there are a bunch of steps to jump through, once it’s working I hope you’ll find it a pretty robust solution.
The goal in all of this is to shorten feedback loops when you develop. This process should give you some confidence that when your code changes the right tests run. The power of this is greatest when you are confident that your tests cover enough of your application such that you will know when you break things. Our next step is to look into the breadth of your tests and setting up code coverage metrics for your app…
[…] « Getting Growl notifications from your Virtual Machine […]